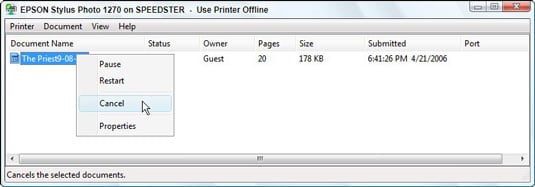
If you send a document to your printer in error, double-click your Printer’s icon (which sometimes sits near the taskbar’s clock) to reveal the print queue, shown in the following figure. Right-click your mistaken document and choose Cancel to end the job.
Use the print queue to cancel a print job.
If you can’t find your printer’s icon, try opening the Control Panel from the Start menu and choosing the Printers icon.
Windows 7 Click on " Start ." Click " Control Panel " Click " Power Options " Click " Change battery settings " Select the power profile you desire Windows XP Click on " Start " Go up to " Settings " Click on " Control Panel " Click on the " Power Options icon " (it is an image of a battery and a power plug) Change the Power Schemes drop down to OSU Energy Saver Click " OK " Close the Control Panel window 1. Press the “Windows” key, type “Control Panel” to bring up the Apps page and then click “Control Panel” to open the window. 2. Click “Power Options” to open the window and then select “Change When the Computer Sleeps” in the sidebar to open the Edit Plan Settings window. 3. Click the “Turn off the Display” drop-down list and then select “Never.” 4. Click the “Put the Computer to Sleep” drop-down list and then select “Never.” Click “Save...
Subnet The main purpose of subnetting is to help relieve network congestion. Congestion used to be a bigger problem than it is today because it was more common for networks to use hubs than switches. When nodes on a network are connected through a hub, the entire network acts as a single collision domain. Partitioning a single network can help relieve network congestion and increase security If you work inside a large organisation or business, particularly one spread across multiple branches, it's highly likely that it deploys a subnet. A subnetting, or subnetworking, is the process of splitting a single large network into two or more strands. This means that an otherwise mammoth and unwieldy network can be subdivided into smaller, more localised networks. First, a look at IP addresses IP addresses are comprised of a 32-bit number with values ranging from zero to 4294967295, split into four octets. In order for it to be...
Join a Windows 10 PC or Device to a Domain On the Windows 10 PC go to Settings > System > About then click Join a domain. Enter the Domain name and click Next. You should have the correct domain info, but if not, contact your Network Administrator. Enter account information which is used to authenticate on the Domain then click OK. Wait while your computer is authenticated on the Domain. Click Next when you see this screen. And then you’ll need to restart to complete the process. When the sign in screen appears, you will notice the DOMAIN\User account is displayed. Enter your password and you will now be logged onto your Domain.


Comments
Post a Comment