How to manually backup and restore your files
- Get link
- X
- Other Apps
How to manually backup and restore your files
Summary
With every new revision of Windows comes the process of migrating to it. Many of you will be initiating a clean install instead of an in place upgrade. Before you do that though, you will need to ensure your data can move to the new version of Windows or that new device you will be buying. In this article, we take a look at backing up your files, specifically, we look at backing up manually. Recent versions of Windows include File History, which was introduced in Windows 8.0 in 2012 but based on my personal experience, it is not as thorough as Windows Easy Transfer which is no longer available or supported. A manual backup is also handy for migrating your personal files to a new PC or an important way to ensure your data is kept safe.
Details
What you need to start this project?
The first thing I recommend you do is invest in an external hard disk. I can't exhaust this enough; they are affordable and can store lots of data. You can probably get a 4TB drive for around $100.

Keep in mind, if you have a complex configuration, this article does not delve into the nuances of multiple partitions or drives with data scattered across them although the same rules can apply in regards to backup. If you do have folders for data such as documents, music, pictures and videos stored on other partitions or drives, then I would recommend you disconnect these data drives and upgrade only the system partition. You can always reattach your data drives after setup is complete.
You want your backup to be as thorough as possible. Within your User folder is a hidden directory called AppData. This folder stores important settings for the apps you use, such as custom directionaries for Microsoft Word, passwords for apps like Chrome, Outlook data files and mail folders for apps like Windows Mail.
To turn on Hidden Files and folders, start by opening your user folder. Press Windows key + R then type: %userprofile%then hit Enter on your keyboard.

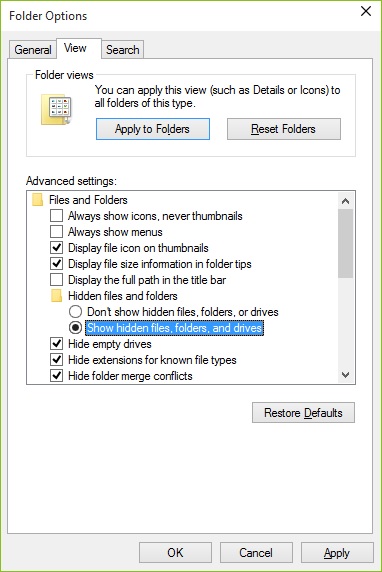
Enabling Show hidden files and Folders
Windows 8/8.1/10 - Click the View tab then click Options then click the View tab. Under Advanced settings > Hidden files and folders select the radio box Show hidden files and folders.
Windows Vista/7 - Click Organize > Search and Folder Options
Windows XP - Click Tools > Folder Options
Windows XP - Click Tools > Folder Options

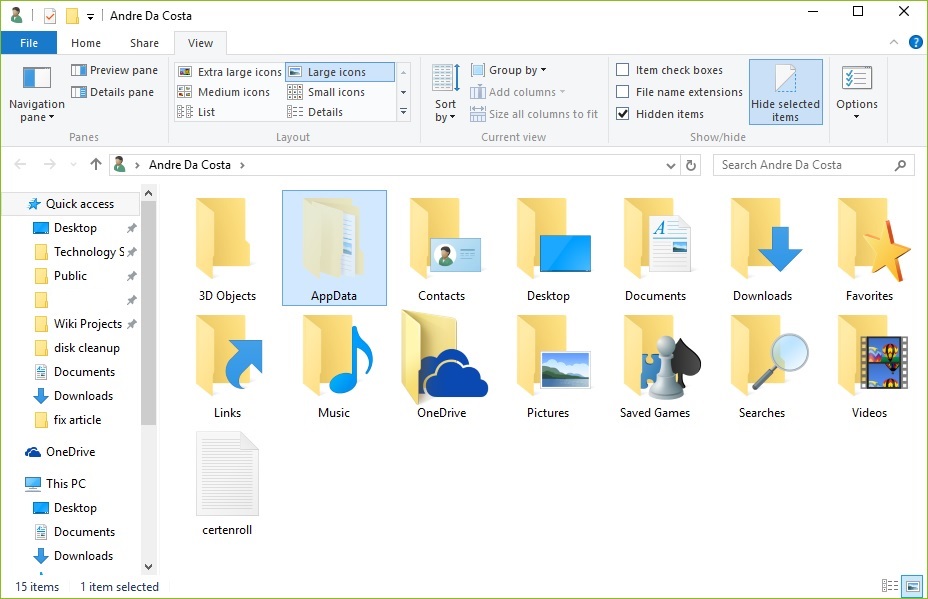
AppData folder is now visible.
After completing the above steps, you should now see the AppData folder appear in your user folder.
Next step is to simply select all the folder. You can do this by pressing Ctrl + A or
Click Organize > Select All (Windows 7),
Click Home tab > Select All (Windows 8/8.1/10),
Edit > Select All (Windows XP).
Click Home tab > Select All (Windows 8/8.1/10),
Edit > Select All (Windows XP).
Selected folders
Open your External hard disk then create a new folder and call it backup or a unique name. Open it then press Ctrl + V or
Click Organize > Paste (Windows 7),
Click Home tab > Paste (Windows 8/8.1/10),
Click Edit > Paste (Windows XP).
Click Home tab > Paste (Windows 8/8.1/10),
Click Edit > Paste (Windows XP).
Depending on the amount of data, this can take a while.
If you have multiple accounts
If you have more than one account on your computer, log into each account and repeat the same steps. Make sure a unique folder is created for each account you backup manually.
Remember other folders you might have
If you store data in folders such as Public, remember to look in there too. The Public folder is located in C:\Users\Public
In Windows XP it is called Shared Documents located under C:\Documents and Settings
NOTE: Some apps will keep their own data stores within their application folders, so make sure you browse and copy those over if necessary. Some users have a tendency to store files at the root of the hard disk, normally where the operating system is installed (Local Disk c:\). Also check there for any important files and move them to Documents folder.
Restoration
Once your backup is complete and you have your new computer setup and Windows is installed and running, the next step is to copy over your files and folders from the external hard disk. You can do this two ways, you can individually copy the contents of each folder into the respective folder on the new computer from the external drive. Here is what you can easily do.
Connect and turn on your external hard disk.
Browse the backup folder with your backed up folders.
Press Ctrl + A or Click Organize > Select All (Windows 7), Home tab > Select All (Windows 8/8.1/10), Edit > Select All (Windows XP).
Open your User folder on the computer
Press Windows key + R then type: %userprofile% then hit Enter on your keyboard.
Press Ctrl + V or Click Organize > Paste (Windows 7), Home tab > Paste (Windows 8/8.1/10), Edit > Paste (Windows XP).
You will be prompted if you want to replace the folders, click Yes.
Depending on the amount of data, this can take a while.
If you have other accounts, make sure the respective accounts have been created and logged into then repeat the same steps.
- Get link
- X
- Other Apps


Comments
Post a Comment